
| STORE
HOURS 9 TO 6 CDT GMT minus 5 hours Monday thru Friday Do not call on Sat. Sun. please |
52. Refinishing the Piano Cabinet The key to a successful restoration is patience and being very fussy.You must NOT take any short cuts if you expect good results. If you have some mechanical ability, and if you are a bit of a perfectionist, you can get your old upright or grand piano back to show room condition-- or very close anyway. I suggest you read other pages of this book to see what your piano offers in challenges and rewards. Read enough also to learn to think with me. I have a way of saying things that may be odd to you. I am taking pills for it, but you need to get my intentions clear as you read the following instructions. I get a lot of satisfaction out of helping people restore pianos. It is an art form as far as I am concerned. HERE
IS THE GLUE AND FINISHING PRODUCTS
There
are Five Questions You Must Consider |
|
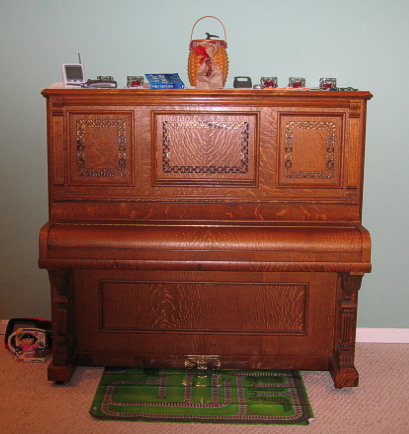
Ryan
Estep, age 16, completely restored this 1896 Hamilton. |
I hope you are combining instructions from Chapter Five with these instructions! Now, take the hinge off of the key cover of the upright and the grand if it applies, and take out the lock hardware and any metal end fittings. If the keyhole brass escutcheon is missing, order one from my Online Catalogue. Take all of the brass or nickel plated parts off, and buff and spray varnish them.
Remove all the old rubber bumpers. On many old uprights, all that is left of the rubber bumpers is the metal tack head. Carefully work this tack head out with a tool without damaging the wood. Patience! Remove the wooden knobs from the key cover and desk. If they are missing, order at once from my Catalogue or your tuner. Order rubber bumpers while you are at it. Remove all felt trim on the outside of the cabinet.. You will want new felt which we supply in our catalog.
Now take the pedals out of the upright piano. Look elsewhere in this section for Repair of the Pedals and their hardware. If the pedals are nickel plated, they probably have a worn spot, and they may be rusted. If they are otherwise still in good condition, can you send them to a chrome plating shop? If you can, I suggest you do so. Chrome looks "whiter" than nickel plate, and is harder. Be sure to include the toe plate if you have the pedals chrome plated.
If you cannot find a plating shop, send for a new set of pedals from my Online Catalog, Upright pedals and Grand pedals. There are differences in pedals for various pianos! Be sure the ones you order are right for your piano. Measure from the horn to the hinge pin especially. If your pedals are brass, that is great. Just clean them up with Brasso. DO NOT buff them with steel wool. You can spray varnish them to prevent tarnishing.
Check the casters. If they are ugly, bent, and sticking, this is a great time to replace them. If they are the old cast iron casters, they are very prone to damage all floors. You should consider the double rubber wheeled casters we sell. They will not scratch tile and score floor covering when you next move the piano. They "trail" better also. To put them in, lay the piano on its back. DO NOT try to tip it up and insert them from beneath, unless that is, you are very well insured. See the section called, Casters- Replacing and servicing in this chapter for more instructions for caster installing. You can order them from my Online Catalogue in the back of this book, or call you tuner. DO NOT order them from a hardware store. They will vastly overcharge you for them, and they may sell you non-piano casters. That will lift your piano too high for normal pedal use, and it will look really klunky to anyone aware of the trade.
If the piano is very old, it may have ornamental picture frame inserts in the desk and in the lower board. Take these inserts out, and treat them separately. You may want to cover them with black or maroon velvet, especially if the inserts are damaged. This was done in the 1800s, and it can add a classy touch. It is a very legitimate option. I like it myself.
If you have a Fischer, Wegman, or other Austrian style upright, it will have a "drop out" desk. Dismantle the whole thing, since it will most certainly need some small repairs, and it will look much better detailed outside of the front piece.
You begin with the finish. Lousy pun, right? I am a Hollander, and you will just have to put up with these puns. Besides, you look too serious right now. Loosen up a bit, OK?
The first step in stripping is in the proper use of the stripper. Any stripper from an established company will do just fine, but I insist that you find one that is not water based. You will also need a medium width putty knife or blade type item to scrape off the stripper. Add gloves for sure. This stuff will stain your hands bad, and some strippers are pretty caustic.
The trick with stripper is, stroke it on with a brush in a medium heavy layer, and DO NOT "paint it in." In other words, don't stroke back over your first pass. Don't ask me why, but brushing it in will cause it to fail about 50%. Let the stripper sit on the wood at least as long as the instructions on the can require, but not a lot longer either. You don't want it to dry out. If you work outside, try to avoid direct sunlight to prevent drying too fast, but also avoid high humidity days.
When you scrape off the stripper, use a putty knife to take up sections of the mixture. BUT, be sure you are going in the direction in which the grain of the veneer is falling away. In other words, you don't want to stroke against the grain. This is pretty hard to determine, so get close to the wood, and look deep into the veneer from several angles to be sure of yourself. If you stroke against the grain, you can pick up an imperfection in the wood, and you can lift a long piece of veneer right out of the wood.
Try to hold the putty knife almost level with the surface as you lift off the stripper. If you get a high angle going, the putty knife can suddenly start chattering, and the result will be chatter marks in the veneer which have to be sanded out. If you are careful, you will not have to do any repair to the veneer after this whole process.
Don't get the stripper which you are removing on a good floor. It stains very badly, and it is nearly impossible to remove. If you have to do the piano in your home, you need to cover the whole area under the piano with heavy plastic. Beware of tracking the stuff around the house.
You may have to do the stripping process two or three times. Rather than putting on one very heavy coat of stripper, do more than one treatment. You will have better results.
To get varnish out of crevices and scroll work, use a tooth brush to scrub in the stripper, and the same to remove it by rolling it out of the crevices. If you started with an old upright which was painted two or three times with 1950s puke green paint, you have many applications of stripper ahead of you. Just use caution as you get down to the veneer itself. You will get impatient with the many applications, and you might get careless as you get to the wood surface. That will result in damage.
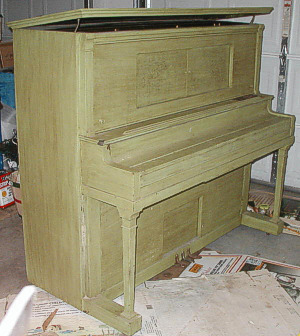
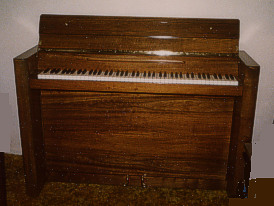
The graphic at the left shows a piano which was "antiqued" probably during the 1950s. This process resulted in a very ugly piece of furniture. Of course, the 50s was an era of weird things, right? That was when we wore pink and black-- us guys even. And, all the girls ran around eating celery and with a transistor radio hanging in their ear. The musical classics included Harry the Hairy Ape and The Purple People Eater. Ugh.
 If someone
stripped and then painted your piano, you really ought to do the same again, and
paint it. You will never get all of the paint out of the wood grain without destroying
the veneer. Usually though, you will find that they painted over the old varnish,
and you can get it all off just fine. There is a wonderful one-coat product which
other tuners tell me works well. I am not familiar with it, so you should ask
around before experimenting. Call Pat Summerall-- he sells all sorts of
goo for some harware store.
If someone
stripped and then painted your piano, you really ought to do the same again, and
paint it. You will never get all of the paint out of the wood grain without destroying
the veneer. Usually though, you will find that they painted over the old varnish,
and you can get it all off just fine. There is a wonderful one-coat product which
other tuners tell me works well. I am not familiar with it, so you should ask
around before experimenting. Call Pat Summerall-- he sells all sorts of
goo for some harware store.
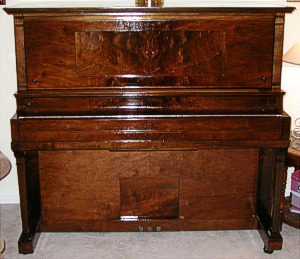
On the right, you see the end result of stripping off the baby poop green on the old beast on the left. So, you see, it can be done. Don't give up to easily :-) This piano was done by a customer of ours: Ed Greenwell, Director of TN Projects American Chestnut Cooperators' Foundation in Cooksville, Tennessee, which is just down the road from the McCoys and the Hatfields, who are two very real families with an attitude. Ed Reports:
Here are a couple of pictures of our $50 garage sale piano. It is a 1918 Lexington player with the player works removed about 40 years ago. This Lexington was manufactured by Conway, a subsidiary of Hallet & Davis. The butterfly veneer is Mahagony and is veneered onto American Chestnut.
This trick of using two kinds of wood is really old world workmanship. I love it, but it has gone out of style in modern times. Mahogany is one of the most rewarding woods to work with. Just be sure to lift out some of the added stain, as I discuss later.
Do NOT sand the surface.
Please do all the way around the edges of flat pieces you restore. Do the inside of the top of uprights, and, of course, the under side of the grand lid. It is ugly to lift the top of a piano and see dribbles of stripper that ran under the edges. Of course, you will have to take the top off the grand piano, and if possible off the upright to do perfect work. When doing the edges, be very careful. Those are not the end grain on the base wood. Old uprights and grands have immaculate veneer work, and you must be very careful not to lift the grain in the end veneer or along the corners as you take it off with the putty knife.
SOLVENT CLEANSING:
The second major part of the stripping process now starts. Make a 50%-50% mixture of denatured alcohol and lacquer thinner. This is dangerous around flames, so avoid hazard in that respect. Keep your cigar smoking uncle OURSIDE if you are using this mixture. Alcohol often has no color to the flame when it burns. DO NOT use rubbing alcohol! Read that last sentence again please. Denatured alcohol is sometimes called solvent alcohol.
Have two rolls of paper towels on hand (plain, NOT printed), and get a couple of bags of 0000 steel wool from the hardware store. Some steel wool should be left over for the next step. Dip a pad of steel wool into the solution you made, and puddle it onto the surface of the wood. Try to have the surface level. With the main cabinet, this step is tricky since you have to get the surface pretty wet. Be sure you cover the floor to keep from staining it.
Be very careful if you decide to strip a grand piano all the way into the inside of the cabinet. Any stripper you drip on the harp will remove the gold paint. Mask it off if you are in doubt, and be alert. This world needs more lerts, right? Sometimes the inside of the grand piano cabinet has a light wood veneer, such as maple. If it is still looking good, you may opt to buff it with 0000 steel wool and hand rub on a coat or two of tung oil. If you are removing the strings and the harp to paint it, strip the inside of the cabinet and the sound board all at once. Work from the top of the rim downward to pick up all your spills as you progress. Do not do the sound board with the denatured alcohol and lacquer thinner. Hand sand it with very fine sand paper after stripping it. Finally, buff it with 0000 steel wool until is shines before adding a finish. Do not overdo the sanding of the sound board. It is only 5/8 inch thick. If you wish to fill cracks in the sound board, SEND MAIL to learn the tools and technique for doing this.
After you puddle an area with the solvent, scrub it with pressure and slow strokes. You want to lift the last of the varnish out of the wood. Your steel wool will also be polishing the surface through the solvent. Scrub for a while, but do not keep this up until the area is starting to dry. As you see the solvent is starting to dry away, use the paper towels in your other hand to wipe up the solvent. Do this in almost a panic fashion. See how much you can pick up very quickly with the paper towels- broad sweeping strokes. Also, see if you can bang your elbow in the process.
You will have to do this process over and over. After each pass with the solvent and paper towels, the surface will completely dry up. Look deep into the veneer. No, you will not see guru Maharishi, but you will see shadows or clouds here and there. Lest you go weird on us, this is serious-- that is varnish you have not yet lifted out. You MUST remove it all to get perfection. Since there is no water in the mixture you are using, you will not damage the wood, and it should not lift grain.
With mahogany pianos you will also be lifting out muddy red stain. Piano factories, due to Victorian notions, added this red stain at the turn of the century because people wanted mahogany blood red. Get all the stain out that you can. The natural wood is very beautiful.
Again, repeat this step over and over until all clouds are gone. You will have to use fine tools and tooth brushes to get the varnish out of the grooves in ginger bread or scroll work, but do it. A sure sign of amateur work is to see a line of old black varnish in the creases and crevices of the scroll work. Please take the time to pick out every bit of the old varnish. I mean, if you don't, I may have to send the boys around and "busta you knuckles, huh?"
Strip the name decal off. You can order a new one from my Online Catalogue, and I give instructions how to put the new one on in Decal Application. However, and I give you this in caps, TAKE A DIGITAL PICTURE OF THE DECAL BEFORE YOU STROP IT OFF. We may need this in order to match your decal perfectly. Please replace the decal. Do not strip around it and leave an ugly patch of old varnish and aged decal. Personally, if the decal is not available, I would still strip off the decal. I hate the look of an old grungy decal right there in the middle of the fall board.
 Do
not strip the inside of the upper sides of the box in an upright if it is veneered.
There is usually no way to do it part way down and make the stopping point look
nice. Also, try not to dribble stripper down over this wood. If inside wood veneer
is bird's eye maple, clean it and polish it with lemon oil after the whole restoration
process. Do not be tempted to use solvents or solutions to clean up the tuning
pin area. Read that sentence again please!
Do
not strip the inside of the upper sides of the box in an upright if it is veneered.
There is usually no way to do it part way down and make the stopping point look
nice. Also, try not to dribble stripper down over this wood. If inside wood veneer
is bird's eye maple, clean it and polish it with lemon oil after the whole restoration
process. Do not be tempted to use solvents or solutions to clean up the tuning
pin area. Read that sentence again please!
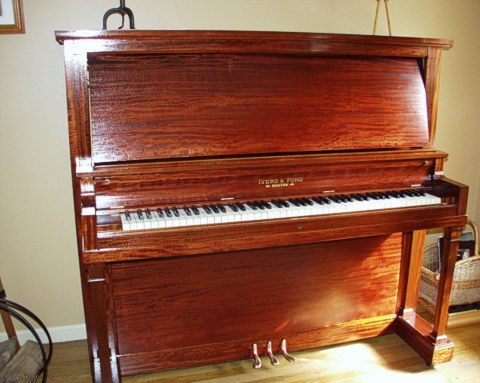
Here is an Ivers and Pond, 1918, restored by Kurt Kretschmer of Scituate, Massachusetts. He used our instructions on this page, and buffed the pedals instead of buying new ones. See them here.
The patina is seen to be furniture and satin. Kurt took the tung oil to the number of coats that would bring the maximum high polish found on well done furniture. Any more coats would start to give the polyurethand look, or the look of lacquered bowls from Japan, which is not desirable on furniture. The mahogany throws light in interesting ways, as can be seen in the lower areas which are reflecting some yellow hues. All in all, exceptional work on an over built piano which is not nearly as famous as it should be. You cannot go wrong with an old era Ivers and Pond.
BUFF,
BUFF, BUFF:
The third step in stripping is buffing the surface. Get 0000 steel wool for this purpose. Buff the dry veneer and all areas you intend to re-finish. Buff and buff in long steady strokes with moderate pressure. Buff until you can't stand it anymore. Use NOTHING but 0000 steel wool. NO sand paper. It is possible to buff all the way through the veneer and spoil it. Use some common sense here. DO NOT USE POWER TOOLS ON ANY OF THE STRIPPING PROCESS. You are done buffing when the wood shines with a near furniture finish. If you never got water on the wood, you may be surprised to find that the wood shines very easily, and little buffing will be needed. When you put the final finish on this surface, you may have a better finish than the manufacturer had.
Perfectionists: You can go around to a cabinet shop, and ask the owner for some wood chips of the same kind as the wood used for your veneer. Buff the veneer with these wood chips. This will insure that, if any bits of the wood get into the veneer and you varnish over them, they will disappear into the background. Purists tell me that steel wool bits can be left behind, and they can sparkle later after the finish is on. I use steel wool, and I have never seen this happen, but then, you perfectionists may like this touch.
Lastly, dampen a couple of paper towels with denatured alcohol only, and wipe off all of your buffing dust. Do this without wetting the wood heavily. Whatever you do, DO NOT use rubbing alcohol for this work. It is partly water, and it will lift the grain. Disobey this instruction, and you deserve all the trouble you get.
As with all paint work and furniture finishing, preparation of the surface is about 80% of the work. If you take your time with this step, the final finish will be very rewarding.
If you are not sure you have perfection, call a cabinet maker to come and look at your results, and ask him to be critical. He will show you anything you need to improve.
If you are a perfectionist, this will be one of your most rewarding projects of a whole life time. The old piano companies of long ago used the best quarter cut hardwood veneer that could be found, and they put it on with insane perfectionism. In old uprights, all of the veneer and finish wood pieces came from the same tree. Old uprights and grands are a very rewarding base from which to start toward masterful end results. The key word here is, as you guessed, PATIENCE. You just cannot hurry this kind of work.
![]()
If you have veneer damage, do not panic-- go to the topic of Veneer. You will learn how to make the repair you need. Be sure to do this before you do the buffing process, or Step Two above.
Whatever repair you do on the veneer, you must remember that veneer is very high quality wood, but IT IS VERY THIN. NEVER USE POWER TOOLS ON THE SURFACE OF A PIANO. I have seen pianos that had a real future for restoration, but some poor soul took a belt sander to the thing, and that sander went right through the veneer instantly. You better do what I tell you here, OK?
Also, you DO have veneer. I don't care how convinced you are that your piano is solid walnut-- no such thing ever existed. In fact, walnut would be terrible as a base wood for a piano. There have been some old oak pianos which had a lot of solid wood, but even there, don't assume this in order to be safe. On recent pianos, say since about 1955, a lot more solid wood was used in order to lower the cost caused by veneering. Consoles and spinets almost all have solid wood.
If, after you strip the piano, you see that the veneer is badly broken, and pieces are missing, I suggest you go ahead and glue the veneer back as below, but fill the bad places with Weldwood. Sand the Weldwood repairs, and paint the piano. It will look better in the end. Otherwise, you will spend the rest of your life trying to hide the end with the disgusting veneer.
If the veneer is loose, you will want to glue it back before you strip the old finish off. Use a long blade to apply Elmer's carpenter's glue under the veneer. Get a pretty generous application of the glue.
The trick in this operation is to clamp the veneer flat. Bungie straps, long strips on inner tube rubber, and cord can be used. We sell some huge rubber bands which can be used to hold veneer on the piano. Veneer on the ends is most easily clamped by upending the piano on a flat floor, but this is dangerous. Have plenty of help.
If you can't get it real tight, before you glue it, try the following: 1. A supply of wood screen molding. 2. Some smallish finishing nails. 3. Pieces of cardboard. Check out the Diagrams. Cut the screen molding into lengths which will more than cover the area you want to glue. After gluing the veneer down, tack the veneer to the piano by driving the finishing nails through about four layers of the cardboard and the screen molding.
This sounds terrible, but after the veneer dries, you can pick the cardboard away from the nails, and you can pull the nails with pliers or a claw hammer, rocking the claw hammer on the screen molding. The holes from the nails can be filled with carpenter's wax pencil of the color of the veneer. Find it at your hardware store. I did this once, and the results were very good, Nobody could see the nail holes.
The front ends of the lower bar that holds the front casters are often ruined. This is usually done while moving the piano. Go to a wood specialty store, and buy a piece of veneer to match your piano. Strip one of the end blocks at the right or left end of the piano keys, and strip and buff it as in the directions above with the steel wool, but do not add the finish coat. Take it along to match the veneer repair piece.
Get down on the floor with a good ruler, and measure the end of the lower bar. With a small square, draw a picture of the piece you need on the veneer you bought. Use a pencil. Next, find the best set of sheers you can to cut the veneer. If you can get away with it, your wife's sewing sheers will be the best.
When you cut the veneer, you HAVE to cut away from the grain. If you cut against it, the sheers will try to follow the grain. Cut the piece just a little bit bigger than the area you want to cover.
Glue the piece onto the end with the Elmer's carpenter's glue. DO NOT dress the edges of it until after it dries. To clamp it on, you can run bungies and our monster rubber bands around back of the piano and from inside the lower box. Cut a block of wood just a bit larger than the veneer piece to place against the veneer, and run the straps around front to the block of wood. Do not use the wood strips and nails as above.
Again, Check out the Diagrams. After the piece dries, dress the edges with fine sand paper on a wood block or with a fine toothed file. Again, you MUST sand away from the grain of the wood. Slightly bevel the edge and corner, as in the illustration, so that folks won't snag the veneer with their feet or clothing.
As I suggested earlier, if a piece of scroll work is damaged on the desk, see if you can take off a corresponding piece on the opposite end of the pattern. If not, it is very hard to fill it and make it look good. An old timer cabinet maker could do it, but the pizza bribe may have to be exalted to a steak dinner for two.
Gouges and burns in the veneer are a real problem. They can be filled with lacquer stick, but the task is an art form. We can supply the lacquer sticks, and you should SEND MAIL for instructions on how to do this.
Water stains are nearly always right on top of the piano. Wherever they are, buy some stain that matches your veneer at the hardware store. AFTER you have stripped the surface, strain the water mark. With a cotton swab, carefully paint only the area of the stain. Take your time. You might want to only slightly stir the stain so that you are not getting too heavy a dose with each application. Let it dry and buff off the excess with steel wool, and give it another coat if needed. Be sure to let the piano sit for a good period of time before applying the finish so that the stain carrier has dried out of the wood.
![]()
This step is much neater and dignified than the previous steps. If you have done good work in preparation, putting on a finish will make you feel like an artist.
|
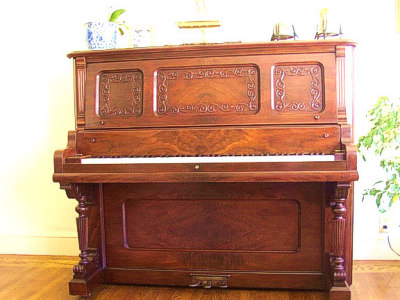
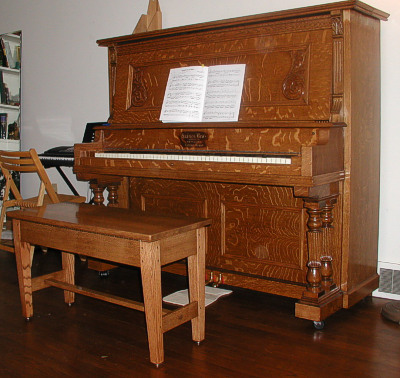
Steve I thought you might like to see a photo of my recently completed piano project. I got all my parts from you and appreciate your tips on the website. The piano is a Haines Bros made in 1902 that was purchased by my Great-grandfather in 1906 from a theater in Pittsburgh, Pa. It plays and sounds very nice. The photo is before the second keyboard leveling so the keys look out of level and the molding on top of the case was not yet installed. I made the bench to match the old bench that was just too beat up to repair. Thanks,
|
Be sure you DO NOT
try to do any re-assembly before putting on the finish. Also, make sure you have
a dust free work area. If you live on a dusty road, you MUST wait until the wind
is blowing away from your home, or after a rain. If you work outside, spray down
the lawn around the work area before you start refinishing. The best time to re-finish
the piano is in the winter when the ground is covered with snow and the inside
of the house is dry-- working INSIDE of course.
You folks in the Southeast will have to be sure you have a dry day. Fat chance, right? Humidity will fog a surface, and even if it doesn't, each coat of finish can take up to three days to be really dry. All that time, any dust or cat hair that makes it onto the surface is there to stay. If you use tung oil, you can buff down any such junk, and add another coat.
If you have a friend with a paint booth, you might want to haul the piano there, and pay him to spray it for you. You can even put on black lacquer in that case. NEVER try to put on lacquer in a garage or in your home. It is the hardest finish to get right.
I use Tung oil. Also, please use the best product, which is Formby's Tung oil. That old rascal has some secret formula, and it is the least troublesome of all the brands. Also, hey, are you going to do as I say???? Get the GLOSS tung oil. You will say, "Oh no, I want a satin finish." Right, you are going to get one, if ye faint not. With the GLOSS stuff you put on a coat, then take a look at it. The first coat will disappear anyway. Then you go on to add coats until you have a satin look, and you stop adding coats. Some pieces of the piano will need more coats than others in order to match all the parts of the piano. Just do as I say.
CAUTION: Do NOT apply the tung oil if it is below room temperature. Also, the wood you are applying the tung oil to must be at room temperature. If the tung oil is cold it may be too thick and not dry for some time. Again, do not apply the tung oil if the day is very humid. Mid winter with the heat up is the ideal time. Beware of wood stoves-- they put a fine ask into the air which cannot be seen, but it could slightly cloud the tung oil. If you get into trouble with the tung oil you can call the Formby's people and get counsel. They may tell you not to apply tung oil to veneer. Don't believe it. I have done it many times, and so have others. Just don't put it on too heavy at first.
Try to keep your work pieces in a level position. Now here is the trick with tung oil-- you'll love it. You put it on with your hands-- NO GLOVES. It won't hurt you. It is made of nut oils, and that will suit YOU just fine, right? :-)
Enjoy! Dribble a little, not a lot, onto the palm of your hand. Turn your palm down on an area to be coated, and start rubbing it in. Cover the area evenly, spreading the tung oil as far as it will go, and DO NOT leave puddled effects. Rub and rub. Rub and rub some more. Rub until your hand starts getting warm from friction. That helps the tung oil to "set up." When your palm is good and warm, and your are feeling the drag increase, get off of it.
Yes, I know it doesn't shine. That's OK. It won't ever shine just as you quit rubbing. Go have a cup of coffee. If it is a dry day, the surface will dry in as little as a half hour. Now, look at it. Isn't that beautiful? Wow! What wood. I like this because you, the artist, are working with the Divine artist, God, who gave you that piece of wood to glorify. I feel sorry for these nut cases who think that creating beauty out of a piece of wood is murdering a tree.
Well, the first coat really didn't make it shine at all, right? Be sure the surface is totally dry, even if you have to wait three days, then give it another coat. With tung oil you can put on coat after coat until you have the wet look of Chinese lacquered bowls. Why? Because that is exactly the process you are using.
To get in the crevices of the scroll work, use a soft bristled tooth brush-- NEW one please. Work tung oil into the recesses, then rub it out as much as possible with your wee fingers. Try to avoid the gloopy puddled look. I told you in the front of the book that we would use hill billy technical terms, right?
Between each coat, the surface needs to be rubbed. The first coat can be rubbed out with the finest sand paper you can find, or you can use the 0000 steel wool. Don't do a lot of rubbing-- just take off any rough prickles. This is not like rubbing out car paint. Be sure to wipe down with a lint free paper towel just barely damp with denatured alcohol.
Before the last coat, I want you to use wood shavings, but the surface MUST be dry as a bone. Get the wood shavings from your cabinet maker friend, and try for shavings of the same wood you have for veneer. If you can't do this, don't rub it out at all-- go on to put on the last coat.
If for some reason the tung oil clouds, let it dry for several days. If that doesn't help, buff the cloud out with 0000 steel wool, and give it another coat. You may have left some of the old finish in the veneer which is having an argument with the tung oil. I have a new product to be posted soon in the Online Catalog which is supposed to take out these clouds-- watch for it.
To put on the decal (which you ordered from my Catalogue) turn to Name Decal Application earlier in this Table of Contents, and read it all. One note though which is not in that section-- apply the decal when the surface is dry to the touch but still a bit fresh. The decal will stick better. After you put on the decal, use a fine bristled soft artist's brush, and wipe over the decal with tung oil. Do not work hard at it or rub it with your hand, or the decal may lift. Feather the tung oil away from the decal area, NOT touching the decal, but using your fingers. This removes the puddle-edged effect. If the decal lifts and breaks, you must let everything dry for days, and buff it off with 0000 steel wool, and start over. By the grace of God, I have never had to do that.
![]()
Reassembling the piano is now very different from when you took it apart, right? You are going to take your time and do NO scratching. Be sure the parts are very dry before you reassemble. You don't want to leave finger prints, and tacky tung oil will glue the pieces together-- This is not good!
Read the section on dismantling the piano in Chapter Five, and reverse the process. Be sure to glue (if you don't have self-sticking) the new red nameboard felt strip on the key cover before you put it in place. It should show out from under the edge of the key cover about one eighth of an inch but not quite touching the back of the sharps.
Also, order a piece of felt for lining the holes the pedals go through. Cut a piece of your this felt an inch wide and long enough to run around the inside three sides of the hole for each pedal. Glue this with Elmer's Carpenter's glue to the sides and top of the hole, letting it protrude about an eighth of an inch. Do all of the pedal holes. Dark green seems to be traditional here, but red matches other felt on most pianos.
With grands, have a friend or two on hand to help you put the top on. It is just too easy to lose control alone. Also, have Harry hold the lyre up while you set the screws and rods.
Put the rubber bumpers on last (see below), and take your time. You can order new rubber bumpers and knobs in the Online Catalog. Don't be nervous when you hammer them into place. Don't hit your fingers. Hold your tongue right, Don't let anyone watch.
Put your new wooden knobs in. If the wooden knob screw holes are worn, add toothpicks and Elmer's glue.
You Elmer's people owe me a couple of steak dinners for all the times I've recommended your glue :-)
The last step in this whole process is to threaten the kids if they ever scratch the piano. Again, bribe them with pizza or chocolate if they do right. Give them a lesson in touching the keys rather than pounding them.
You could then celebrate, and call the friends together for a Gospel sing. Don't wash all the stain off of your fingers. That way, your friends will ask what is wrong with your hands. HA, you can then take them and show them the piano. Humbly, of course.
What next? The piano stool of course,
then the closet doors, and on through the house. Restoration is addictive. Be
careful.
REPAIR
OF THE ACTION
AND MUSIC MAKING PARTS
Again, this is the FIRST step really. I have put it last only because this is a page on finishing a piano.
So, READ THE MENU of mechanical and musical issues, and identify what you need to do and how far you want to go doing the inside of the piano. After you finish those tasks, and if you like the music, come back here and finish the cabinet. You may need help from a good piano technician to do some of the musical restoration work. Smart people will mix their skills with those of a helpful technician.
The
piano below is an Evanstatt.
This is the shortest spinet I have ever seen.
It had about 85 keys. It was made in the UK, and it
was the model used by
Queen Elizabeth and Princess Margaret
when they were young girls and taking
piano lessons.
The
author restored this piano.
 LINKS:
HERE IS A PIANO IN PROGRESS-- This is amazing veneer. I never saw such picture-like
images.
This is a great example of quarter cut veneer which was all taken
from the same tree.
SEE BEFORE AND REFINISHING PROGRESS -- SEE
IT ALMOST DONE.
CAUTION:
All of those rags and scrubbers you have been using have volatile solvents in them. Be sure to dispose of them properly so that you don't get spontaneous combustion. I saw it happen once. You can't imagine how it feels to grab a waste basket roaring with fire and try to get outdoors with it without burning off your eyebrows.
ALTERNATIVE:
After considering all the aspects of restoration of your piano, are you feeling that this is well beyond you? Or, possibly you have the skill, but you do not have the time. Maybe the piano will sit in your garage or back room for months while you try to find time to complete it. If this is the case, we want to suggest several piano restoration people. These people will do the whole piano, including ALL of the music making aspects which you would not want to attempt. There are only a few here, and price is not the consideration. We looked only at the quality of their work:
VERHNJAK PIANOS--
This is a Canadian firm. The skills come from Slovenia, and these people are restoring
European pianos as well as North American pianos. Check out the finished product.
They serve mostly Canadians in the West of Canada.
Tel: (604) 538-1847
Fax: (604) 538-4586
Toll Free: 800-240-7426
Unit #13 - 15531 -
24th Ave.
Surrey B.C. Canada V4A 2J4
ILLOS PIANO REBUILDERS AND MUSIC CENTER
Their list of customers is very impressive. Some even allow you to contact them.
2940 Main Street
Buffalo, New York 14214
Voice: (716)832-0013
Fax: (716)832-0157
info@illos.com
JOHN A TUTTLE PLAYER PIANO REPAIR SERVICE
This gentleman is an exceptional servant of the customer. He has many years in restoring of players.
He also supplies parts needed for you to restore the mechanical works of your player piano.
John gives you a great volume of information to read and learn about pianos.
Our Phone Number during Business Hours (EST) is 1-732-840-8787
Our Address is: 407 19th Ave., Brick, NJ, 08724-2605
C. A. GEERS PIANO COMPANY
These people are master craftsmen. Browse the site, and you will be fascinated by the details they
share with you. You will see what it takes to restore a piano to top condition. Some modern
piano restoration shops will return your piano to you better than when it was new. This is because
of the improved materials now available in the trade.
691 N. Miami Ave.
Cleves, Ohio 45002.
Telephone: 513-941-7666
Fax: 513-941-5856
THE PIANO LAB
Steve Therault has a busy restoration shop where he will restore your piano. He also trains people
in restoration skills. His ethic is refreshing. This also gives anyone in Texas a local option.
P.O. Box 62901
San Angelo, Texas 76906
Phone: (915) 944-0772
info@pianolabs.com
LINDEBLAD PIANO RESTORATION
Browsing their site, I see some amazing work and piano choices. I also see that they don't give anything
away. If they have a good warrantee period, I suspect they are a very good choice to find an exceptional
musical instrument. Take a look at this mahogany masterpiece.
101 Rt. 46
East Pinebrook, New Jersey 07058
Phone: (973) 575-0163
Email: contact@LindebladPiano.com
UK RESTORATION SITE
I don't know anything about Keith. His reference to people he has restored for is impressive.
If you contact him, ask for personal references whom you may contact.
![]()
![]()

 Also,
check with a tuner to see if the brand of piano you have really has a good reputation.
For example, if you first restore a Winter upright, then later inquire around
to see what it is worth, you may be very sorry what you learn. Stick with old
trusted names like Fischer, Ivers and Pond, Cable, Brinkerhof, Vose, and other
really old uprights from around the 1910 to 1929 era. What fine pieces of workmanship,
and what a great starting point. Ask your tuner what you have please. Of course,
if you have a Steinway, Knabe, Boesendorfer, Beckstein, Chickering, or Kurtzmann,
these are well known high quality pianos. You should not toss out one of these
pianos without making a try at restoration.
Also,
check with a tuner to see if the brand of piano you have really has a good reputation.
For example, if you first restore a Winter upright, then later inquire around
to see what it is worth, you may be very sorry what you learn. Stick with old
trusted names like Fischer, Ivers and Pond, Cable, Brinkerhof, Vose, and other
really old uprights from around the 1910 to 1929 era. What fine pieces of workmanship,
and what a great starting point. Ask your tuner what you have please. Of course,
if you have a Steinway, Knabe, Boesendorfer, Beckstein, Chickering, or Kurtzmann,
these are well known high quality pianos. You should not toss out one of these
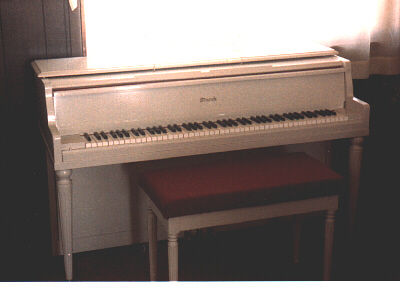
pianos without making a try at restoration.  Question
Three: Are you prepared to paint it in the end rather
than give it a natural finish? If there is no water damage, but you find that
the finish has been damaged badly, you can strip it, fill the damaged wood with
wood filler, sand it, and paint it. With a new decal on the name board, this can
be very rewarding. I did two pianos like this once, and it looked very good, and
it got me a good price. One is seen above at the top of the page. Settle for off
white or almond right now, unless you have a friend with a paint booth who can
spray on black lacquer for you. BUT, you still MUST strip it to have the best
results. Paint on top of paint looks terrible.
Question
Three: Are you prepared to paint it in the end rather
than give it a natural finish? If there is no water damage, but you find that
the finish has been damaged badly, you can strip it, fill the damaged wood with
wood filler, sand it, and paint it. With a new decal on the name board, this can
be very rewarding. I did two pianos like this once, and it looked very good, and
it got me a good price. One is seen above at the top of the page. Settle for off
white or almond right now, unless you have a friend with a paint booth who can
spray on black lacquer for you. BUT, you still MUST strip it to have the best
results. Paint on top of paint looks terrible.
 C.
Have you ever restored anything else? Here is what Michael Stromburg restored,
among other things, which lead him to believe he could restore a piano. I believe
in people who can take a 1958 BSA and make it look like the motor cycle at the
right.
C.
Have you ever restored anything else? Here is what Michael Stromburg restored,
among other things, which lead him to believe he could restore a piano. I believe
in people who can take a 1958 BSA and make it look like the motor cycle at the
right.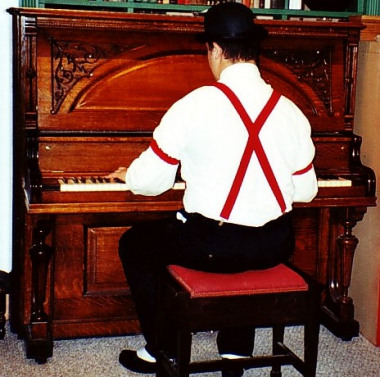