| STORE
HOURS 9 TO 6 CDT GMT minus 5 hours Monday thru Friday Do not call on Sat. Sun. please |

10.
Casters- Replacing and servicing
We
offer a full line of casters
in several qualities,
many sizes, and for ALL types of pianos.
LIABILITY STATEMENT: We take NO responsibility for what you do with the casters we sell you. The following instructions are not a promise of any sort that your experience will be a success or that you will not have issues and troubles handling the piano and installing the new parts. This statement is here because some people do not take responsibility for themselves and blame other people when they have problems or make blunders. So, the following instructions are dangerous and should be ignored UNLESS you take full responsibility for your use of our products. |
Please read the whole page for all pianos since various principles apply to all pianos as you replace casters.
The most common piano to need casters is the old upright, but grands and spinets need them occasionally. The grand or spinet upright should never be rolled around on their casters. If you roll a grand on its casters the casters will want to catch on anything that is in the way. Mic cables in studios and the metal strips in doorways are deadly. Also, casters on any kind of piano will roll a wave of carpet as they roll along. This wave will get larger and larger, and at some point it will fold. At that point the caster can catch on the fold of carpet and wrench the leg violently. This is when the leg on a grand or spinet will rupture at the top of the leg. The caster may also rip a hole in the carpet.
Spinets break legs very easily. The brass decorative casters on the front legs of a spinet should NOT be used to roll the piano around. In fact, you should remove the legs and desk when moving a spinet to prevent damage. Insist on this even with the best intentioned professional movers. I have many stories of professionals breaking the legs off of spinets, and about 85% of them try to blame you for it.
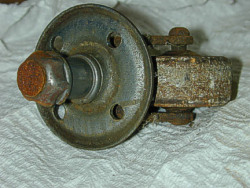
This is a freak caster from long ago. The socket is well made, but it never caught on in the trade. We can supply a socket for this caster in our catalog. |
Full sized uprights are often rolled out the door and up the ramp of the moving truck using the piano's casters. It is always smarter to use a piano truck or dolly. But, if you want to move the old upright on its own wheels, do two things:
1. Buy new double wheeled hard rubber casters and install them before moving.
2. Cut two pieces of 3/8 inch plywood in 8 foot lengths by a little less than the width of the narrowest doorway.
Lap the two pieces of plywood so that the piano can roll from one to the other clear onto the ramp of the truck or trailer.
But, you came here to learn how to install casters, right? Well, I fooled you and told you how to move your piano :-)
Onward to the task at hand....
Lay the upright piano gently on the floor
The upright must be laid on its back to replace the casters. You will need a minimum of three men to lay a full sized upright down comfortably. Put two "two by fours" under it with the back edge of the piano resting on the ends of the "two by fours" BEFORE you start to lay the piano down. This way, after you are all through and want to stand it back up, the piano will be all the way standing up before the new casters touch the floor.
Dave Cochrane and I put an old upright down once so that I could replace the casters. It was heavy, but Dave is a big Irishman, and all went well until we finished the job and tried to pick it back up. We neglected the two by fours, and as we picked it up, the back casters hit the floor at about 45 degrees, and the piano took off all over the kitchen. The new casters wanted to take off the instant they touched the floor. Dave was bellowing like an ox and pleading for mercy, and I was having trouble myself. We finally gave a big heave, and got it up, but it was a close one. This is hernia country also.
It is also very hard to get a hold of the piano after laying it back down because there is nowhere to stuff your fingers under the thing and get a hold of it. So, do not delete the "two by fours" please.
Once you have the piano on its back, tighten the screws in the skid board under the bottom. This never gets done otherwise. If these screws are stripped, half fill the screw holes with toothpicks and Elmer's glue, and replace the screws. The skid board has the pedals mounted to it inside the piano, and a loose skid board will make the pedals wobble and work poorly.
Remove the old casters. Always use a size of screw driver which completely fills the slot in the screw. Do not be tempted to reuse old casters. You should have ordered a set of four before laying the thing down.
Do not stand an upright up on end to put new casters on. The thing will be very top heavy, and if it tipped for some reason, the results would be disastrous. Also, putting it back down, after upending, is very dangerous since the second the casters hit the floor, the piano will move and you will drop the other end on the floor. Not only will the piano be damaged, someone will be hurt badly.
Install all the new casters
If the screws holding the casters in were loose or spongy, purchase all new screws of the same diameter size but a half inch longer. Be sure they will not go all the way up through the mounting wood and out the top of it. If you are still in doubt as to the screws, fill the screw holes half full of wood splints and Elmer's glue before you reset them. Fill mostly the hole where the threads are with very little added wood where the threadless shoulder of the screw is. If the screw gets super tight as you drive it in, stop, and back it right out. You are working in old seasoned hard wood, probably oak. You DO NOT want to break off a screw head. Use a medium powered drill motor so you can feel the resistance, or hand screw them in.
You may have caster sockets which have three holes, and all new sockets are now four holed. In this case use one hole again, and drill new guide holes for the other three screws. Drill the holes at somewhat of an angle away from the old holes so that the wood does not break through between the old and new holes. Be sure to drill a guide hole which is small enough to let the screw threads bite well, but too small a hole will result in an over tight screw which will want to break off.
Sometimes the center mounting hole in the wood, for the vertical part of the old caster socket, is bigger than the new one. This happens if the old turn of the century cast iron sockets were used. This is why the wood grommets are provided with all double wheeled rubber casters which we supply. If you purchase casters made for general applications instead of just for pianos, you will not be able to fit them into the original holes. We carry all casters and sockets in our Online Catalogue.
If your old piano had drop forged sockets like the ones we sent, read on below. If they had cast iron sockets, and if the center holes are just slightly two small in diameter to receive the wooden grommets we sent, you will have to ream them out with a flat wood bit. You will have to use ONLY a 7/8 inch flat wood bit. Check the height of the new drop forged socket, and if it is taller than the original arrangement, you will need to also deepen the hole for the socket with the wood bit about 1/4 inch. CAUTION: Don't go through into the pedestal above the caster or through the wood mounting bar. Be sure to take into account the centering tip of the flat bit !!!!!
 Once
you are sure the socket holes are right, (where cast iron sockets are being replaced)
insert the wooden grommets into the holes FIRST, and tap them in until they bottom.
Next drive the caster sockets into the wooden grommets or the holes until the
round or square plate bottoms. If the mounting plate of the socket does not bottom,
pry it out, remove the wood grommet (ugh!), and deepen the hole for the socket
vertical piece a little more. You MUST have the socket plate mounted solidly into
the wood of the piano frame.
Once
you are sure the socket holes are right, (where cast iron sockets are being replaced)
insert the wooden grommets into the holes FIRST, and tap them in until they bottom.
Next drive the caster sockets into the wooden grommets or the holes until the
round or square plate bottoms. If the mounting plate of the socket does not bottom,
pry it out, remove the wood grommet (ugh!), and deepen the hole for the socket
vertical piece a little more. You MUST have the socket plate mounted solidly into
the wood of the piano frame.
DO NOT hammer on the wheels. Get a big screw driver, and place the bit down on the end of the pin under the wheel, and drive the caster into the socket with a hammer. It is possible to screw the socket into the piano with the wheel in it, but you MUST be sure the socket is going to fit before trying this. You will have to leave the caster in the socket when replacing Darnell casters with the cast iron socket. This is a very exceptional application, so seldom will this apply to you.
If your casters had the same kind of drop forged caster sockets as the original, you may be able to put in the new ones without any alterations. Even so, do not use the old caster sockets. They may be slightly different in how they hold in the caster wheel, and they may have loosened from age where the vertical piece is attached to the plate of the socket. Also, the screws are almost always loosened from age, and they must be replaced with slightly longer ones and possibly with the wood and glue trick.
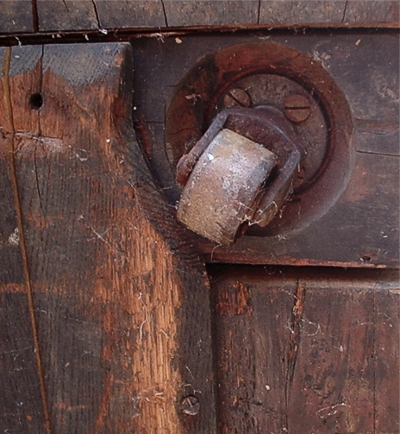
The photo at the right shows the recess that you may need to enlarge because the double wheeled casters need more room to clear the recess. Also, notice that a screw is missing from the skid board. This is your only chance to secure it, while the piano is down on its back. Tighten the skid board screws or drill new holes.
Once the casters are inserted, rotate them while pushing down in them. If they catch on the wood bar in which they are mounted, you must pry them out and route out the wood so that the caster carrier metal will clear the wood by at least 1/8 inch. If you fail to do this, the casters will catch on the wood frame and will not rotate. You can buy a drum router which will mount in your drill motor and work the wood recess down. Be careful about controlling the thing so that you don't jump over and damage the veneer. If you return the casters for a refund at this point, I can assure you that you will never find rubber wheeled casters that will work without altering the wood area. If you do not want to do a little innovating, don't try this job please.
Put a very small amount of light oil, NOT WD40, into the friction points of the casters. Do not put enough to run down on the carpet. Make sure the mounting screws are securely replaced.
Now set the piano up.
Grand Procedures
A grand piano is somewhat easier to do than an upright. The key is to use a safe way to raise the piano so the legs can be removed. You may lift the whole piano up on saw horses, but it is easier to raise up one leg at a time and rest it on something. Remove each leg one by one and finish the job on each leg before going on to the next. Do not lift the piano more than two inches off the floor.

You may want to purchase the Grand Stand for this purpose.
If so, buy
only one, and do one leg at a time.
Never put a grand piano up on more than
one Grand Stand.
Learn more in the Moving Section of the Online Catalog.
A good time to change the casters is when moving
a grand piano.
The legs must come off anyway, so you can do the casters before
replacing the legs.
Grands legs
come off in several possible ways:
1. Some legs are simply held on with two large screws. Remove them, and the leg will drop right off.
2. Some pianos, Steinways in particular, have a tapered wood bar which wedges between a wood piece and the leg of the piano. Remove it, and thump the piano leg inward, and the leg will drop out of the metal mounting pieces in the leg and piano body. Tighten the screws in the metal pieces embedded in the leg and piano body.
3. Some grands have both screws and the matched metal pieces in the leg and piano body, so after taking out the screws, you will need to thump on it sideways to move the leg inward and remove it.
4. Some pianos have a wooden or large metal toggle which wedges against the inside of the leg top. Tap it until it turns out of the way. Then tap the side of the leg until is moves inward and the two metal mounting piece become disengaged and the leg comes off.
5. Some square grands have round legs which unscrew. The top of the leg may have a huge wooden threaded extension which screws into the piano body. This can be a hard one to figure out because there may be another method of attachment. Some squares have legs attached in one of the same ways as the above four. Be cautions.
Grand casters sometimes have round sockets, but more often they use square ones. We want you to find out before ordering so we don't send the wrong socket. If you have very old casters they may have had a strange socket arrangement. You must remove a caster completely and compare it with the online Caster Ordering Page on our site. If they are different, you must either send an old caster to us for matching, or send a digital graphic in .jpg format as an attachment in e-mail.
Read the upright instructions above, for some of the fitting instructions may apply. Such things as routing out the wood when changing from metal to rubber casters, and the fitting of the vertical part of the socket, may need fitting before inserting the new sockets. Do NOT leave a socket loose in the mounting area. If the socket does not fill the hole, the new socket will twist and become damaged, and we will not take it back for a refund under any conditions. If you are unsure of yourself, call a technician to help you install the new casters.
You need to be very careful about your fitting of the screws and sizing the holes into the legs of a grand. For example, the full sized upright leaves room to run a new screw hole in at an angle if you break off a screw head, but the legs of a grand are unforgiving.
There are large solid brass casters on some newer grand pianos. If one is damaged of lost, we may be able to find a replacement, but it will have to come from Europe, and you will have to buy all three since it is impossible to match originals on most grands.
You may want to consider caster cups in which to set the wheels of a grand piano. CLICK HERE to see the selection.
Spinets
Some spinets had the same brass casters on the front legs and at the rear of the piano. Some had decorative brass casters on the front legs and plain steel ones in the rear. Be very sure of what you have before ordering from us. We can almost always match the front and rear ones, and we do sell two casters for this need. It is very smart to replace all four casters when doing this so that they are all new. Since you must NEVER roll a spinet on the front legs, you will want rear casters which are in good condition so that you can lift the front and move the piano on the two back casters.
The rear casters may be special, and the front ones most certainly are very special to your spinet piano. We can match them, but several choices have been used over the years by many piano makers. So, go to the Online Catalog for the Caster Section, and study long and thoughtfully to see which ones you need. If in doubt, send a digital photo in .jpg format so we can have a look also. We also are happy for you to mail a sample caster so that we can make sure we send the right ones.
Send it to:
Steve's Piano Service
717 14th Ave.
Menominee, MI 49858
Installing the casters is common sense mechanical work. You need to be very careful about your fitting of the screws and sizing the holes into the legs of a spinet. For example, the full sized upright leaves room to run a new screw hole in at an angle if you break off a screw head, but the legs of a spinet are unforgiving. You will be able to do some improvising in the rear, but the front casters must fit without any changes. So, let's be sure we get the right ones for the front.
A last warning:
The big old upright piano will now seem very easy to move around on the new rubber wheeled casters, and you will be tempted to just shove it here and there. The moving rule still applies. 80% of the weight in the piano is in the back 8 or 10 inches. If you roll it side forward, and one of those new casters catches on something, the piano will slam down on the floor, or your foot, and you will not be able to stop it alone. Two men must move it, and they must have one hand gripping the handle around back and their shoulder into the thing to steady it. Move it longways forward only.
Keep your eye on the rail, your shoulder to the wheel, and your nose to the grind stone, and you'll get run over every time :-)
To order casters from us, see the Online Catalogue.
If you need to move a piano back and forth between performance areas, you will save the tuning, and prevent damage to the piano, if you invest in a piano dolly. They aren't cheap, but they save damage to the piano and are much safer for frequent moves. If you opt for this choice, do not buy new casters since they must come off to mount the piano on the moving trolley.
Send E-Mail so we can talk over your situation.
![]()


 On to task 10.5
BACK TO PIANO TITLE PAGE
![]()