| STORE
HOURS 9 TO 6 CDT GMT minus 5 hours Monday thru Friday Do not call on Sat. Sun. please |

35.
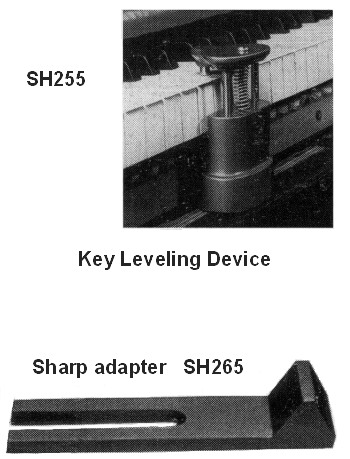
Piano Key Leveling and
Key Lever Felt Restoration Kit additions
Key Leveling and Felt Restoration Kit-- In our online catalog.
If the whites in particular are not level to the eye, you can level them yourself. You need two packets of the smaller paper shims from our Online Catalogue. There are shims for both the center rail pins and the front key pins. They come in several thickness, graduated in thousandths, so that you have many choices as you add or take away in the leveling process.
If you are using the Key Top Restoration Kit, a wood Key Dip (Drop) gauge is provided. Use it through all of the following instruction to measure the key drop. Lay it on a white key, and push down. The top of the wood block should ideally be level with the key next to the one depressed. If not, you need to add or remove paper shims from under the front rail felt washer or bushing. You should level the keys, from right to left, all of them as instructed below, at the center rail bushing first. Then finish up by leveling the keys individually, using the front rail bushing paper shims, when the Key Dip Gauge is used to test key dip.
To start, push down a white key in the center of the piano. How much key drop is there? There should be three eighths to half an inch. If it is only a quarter inch or so, ALL the keys need to be raised and leveled. Go back to Key "dip" Adjustment. Read it carefully, and correct the key "dip" or drop before leveling.
 Once
the Key "dip" is right, lay a long straight edge on the keys. Be sure the straight
edge is not a cheap one which is warped. Use keys at the extreme ends as a standard--
keys which have the key drop you want. Start lifting out the keys that look lower,
and put in a thin paper shim at the center rail pin. One thin shim can change
the height of the key level quite a bit. The keys in the middle of the piano should
be the worst.
Once
the Key "dip" is right, lay a long straight edge on the keys. Be sure the straight
edge is not a cheap one which is warped. Use keys at the extreme ends as a standard--
keys which have the key drop you want. Start lifting out the keys that look lower,
and put in a thin paper shim at the center rail pin. One thin shim can change
the height of the key level quite a bit. The keys in the middle of the piano should
be the worst.
Patience is the key from here on. Two hours later
you may still be puttering with those keys. Just DO NOT change the key you used
first as a guide. If you do, you could have the keys way too high, and the piano
will not play right.
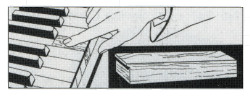
In the example in the diagram, Luigi forgot which key he started with.
To level the black keys, use the same technique with the long straight edges. Lay it gently on the top of the black keys, and try to determine which sharps are high. Push a black key down near a high one. Choose two sharps, as standards, which seem to be right with the overall average. You can push sharps down next to the ones you feel are right, or the highest. You cannot use the 3/8 inch key drop rule on sharps since they are shorter.
There is a cobbled way to determine key drop on sharps. Tape a perfectly straight rod to the top of the highest sharp which is playing right. Use a thin ruler, such as machinists use, between the keys and next to the sharp with the rod attached. You must place the ruler out at the end of the rod about one inch from the front edge of a WHITE key. The point is to measure at the same place where you measured the key dip on the white keys. Note the point on the ruler where the rod is which is attached to the sharp key in the up position, or at rest. Then depress it, and note where the rod is. If the key dip or drop is acceptable, 3/8 to 1/2 inch, then use that sharp as a standard.
Now, go to the other end of the key board, but within the length of the straight edge, and do this to another sharp which seems to be high. Once you have these two sharps where you want them, they are your standard. You will then bring all the rest of the sharps up to the level of these two standards by using the straight edge as your guide.
Mark the sharps which you have chosen for a standard, and do not fiddle with it again.
If the key drop seems to be more than 3/8 to 1/2 inch, lower the high blacks a bit. Do not raise the low ones until the two standards are right. It is not usually the case that keys have to be lowered, but wear of the front rail bushings can cause it occasionally. It is best to assume the high ones are right, and bring up the low ones using the straight edge to tell when you have enough shims.
Work your way from the ends to the center. Again, be sure not to change the sharp you chose for a guide. Be careful that you do not taper off to the left or the right leaving the key drop at one end lowered. If the hammers act up after leveling the keys, go to Adjusting the Action, and make adjustments. You may have to lower the capstans on the back end of the key levers slightly.
If you went half mad doing this job, be consoled. A tuner would get $40 per hour minimum for doing this. Some tuners charge $300 to do this.
Key Lever Felt Restoration Kit Additions
Here are the steps to follow in using the Key Lever Restoration Kit found for sale in our catalog on the Felt Parts Page.
If you are using the Key Top Restoration Kit, you should do the key button and front pin bushing felt first, then the Key Top Kit, and finish the rest of the tasks below and level the key levers last. This will make leveling the keys much more accurate. Order the Key Top Kit here.
Each of the replacement felt parts will be labeled in the kit when you receive it.
Step One-- Remove the key levers and clean the whole area. See Chapter Five for instructions on opening the piano. On an upright you will need to carefully pull the key levers out from under the stickers of the action. On a console remove the action to make room to remove the key levers. On a spinet, you will need to remove the drop wires, and then you can lift the key levers out.
If you have a grand piano, you will have to remove the hammer rail in order to get the key levers out. Your grand action has four or five metal brackets vertically holding the hammer rail and hammers. Remove the whole hammer assembly by removing the screws at the bottom of the front and rear of these metal brackets. Set the hammer assembly aside in a safe place where no one will meddle with it. It is very fragile in this state.
Use a vacuum crevice tool, but be sure to NOT vacuum up the paper shims under the front rail bushings and the center rail bushings. We do not send enough paper shims to replace all or them, only to level them. If the top paper shims are deteriorated badly, you can remove and disregard them. Do not throw away the heavy cardboard paper shims on the bottom of the stack of paper shims.
Step Two-- Remove the felt bushings (like washers) under on the front pins and the small felt bushings from the center pins on the balance rail where the key lever rocks. Do not remove the paper shims (like washers). Leave them in place. Carefully pull the center pins out of the wood with heavy pliers, and replace them with new center rail pins. Take care not to scatter the paper shims so they stay in place. Once the pins are in the wood and started, place a piece of wood on the top of the center pin, and tap the wood down, driving the pins GENTLY into the holes. If the pins want to go in too far, match the depth of the new pin to an old one next to it for a guide. Replace the front rail pins the same way. NOTICE: THE FLATS OF THE FRONT PINS MUST RUN PARALLEL FRONT TO BACK. If you need to remove a new pin or adjust it, use pliers in which the jaws have been lined with electrical tape so you do not score the new pins. If you score a pin, disgard it and use a new pin. You have 12 extras. Finally, place the new green felt bushings (like washers) down over the oval front rail pins, and the new white center rail felt bushings down over the center pins.
Step Three-- You may want to use a straight edge, if you have a long one, to see if the wood balance rail is level. If is is bowed up or down in the middle, you can level it, and save a lot of trouble leveling keys later, by adding or removing paper shims under the wood rail. These paper shims are usually square pieced of cardboard from long ago. Cut more pieces our of poster board or Wheaties box paper :-)
Step Four-- Restore the key button bushings and the felt bushings in the front of the key lever. Use the strip of key button felt provided.
First-- You need to remove the old felt pieces. This can be done by steaming, or you can use our heating iron to bake them so that the glue gives way and they come our rather easily. Order the Jaras Electric Key Bushing Remover, Part Number SH909. Call (800) 338-8863 to order. This tool works like a small soldering iron, but the tip looks like one of the Key Button Wedges in your Kit. Wet the felt pieces in the hole without getting excess water in the wood, and let soak in briefly. Using the Jaras electric tool, or a small tool heated over a flame, heat the felt piece. The steam will soften the glue, and the felt piece will come loose and can be removed with tweezers. Clean any excess glue away. To remove by steaming, hold the bushed hole over a source of steam such as a fabric steamer or a tea kettle. Steam just long enough to soften the glue, then extract with a pair of tweezers. Treating the felt before steaming with a drop of wall paper paste remover will help the process.
You should have measured your key pins to make sure of the diameter. Stand thickness is .146", which is what we will send you unless you tell us otherwise. Occasionally pianos have slightly larger (.162") or smaller pins.
Second--Determine the thickness of bushing felt needed. We send you thin and medium. You won't necessarily use the same felt for the fronts and the centers. Take two strips and fit about 1/4" into the hole on either side of the pin. You want very little side to side movement, but you want the key to move freely on the pin. NOTE: The front rail pins are not round, rather they are flattened. This is to allow for turning of them to adjust as the bushings become worn. Be sure to turn them back to their original position before testing for thickness and replacing the rebushed keys. (Original position means flattened parts on the sodes rather than front & back.)
Third-- Put a little glue on the ends of two strips of felt and put no more than 1/4" of the strips down into the hole. DO NOT USE TOO MUCH GLUE! You don't want excess glue pressing out from under the felt and forming globs. Press the caul into the hole so the it is pressing each strip of felt against the sides of the hole and the caul is tight against the bottom of the key. While holding the caul down tightly, trim the relt at the edge of the caul. Continue by repeating the process with the next key. After you have used all the cauls, let those keys dry for about an hour. Then you may remove the cauls and do another dozen keys. Put the key lever in the piano and see if it move freely but is reasonably snug. If it is tight or overly loose, you may need to use a different thickness of felt.
Finish all of the rest of the Key Button Bushings and the bushings under the key levers at the front.
Step Five-- Remove the action in an upright now if it is still in the piano. Remove the old Key Rail Felt from the back of the key bed at the rear of the key levers underneath where they rest. Scrape the old glue off down to the wood with some tool so that the key levers will all rest level in the rear. If the key rail cloth is in pieces with lower frame mounting points between felt pieces, cut the new felt to match the old pieces. Glue the new felt strip on the key bed with Elmer's Carpenter's Glue. One generous path of glue down the middle of the felt strip is desirable so that the felt will be able to creep as it ages without buckling. For a grand piano you will need to glue the back rail felt to the key bed in the exactly where the old one is. So, remove the old one, scrape off all old glue, and glue the new felt there. Do this BEFORE replacing the hammer rail (rack). Use only one of two lines of glue to hold the felt in place. If you cover the whole back of the felt with glue, the next person will have a terrible time some day in the future trying to remove that felt strip to put in a new one. Also, the felt can crawl over time if you do not glue the whole back down, which is desirable and prevents buckling.
Step Six-- Put the key levers back into the piano. Replace the hammer rail (rack) if you have a grand. Referring to GRAND ">Chapter Five, put the action of the grand back into the piano, and secure it in position with the retaining hardware used to keep it positioned correctly. With spinets get the drop wires back into place. With a console and upright, put the action back in if it is out. It is safer to have the action out of uprights when replacing the key levers. The piano needs to be totally reassembled now.
 Step
Seven-- Take the Lost Motion out of the action,
at least at the capstans at the rear of the key levers. If you do not remove the
Lost Motion at this time, the leveling of the keys could be thrown off.
Step
Seven-- Take the Lost Motion out of the action,
at least at the capstans at the rear of the key levers. If you do not remove the
Lost Motion at this time, the leveling of the keys could be thrown off.
Step
Eight-- Level the keys. Remove the key slip, the wood piece in front of
the keys. This is done by removing the four to five screws under the front of
the piano close to the edge under the 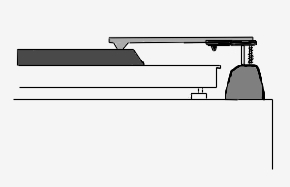 keys.
On some grands and square grands, the key slip lifts straight up and is not screwed
down tight.
keys.
On some grands and square grands, the key slip lifts straight up and is not screwed
down tight.
Follow the instructions which came with the Key Leveling Tool and Sharp Leveling adapter to level the keys. If you lost them, call us, and we will send a copy of the instructions. You must be a customer of ours for this purpose.
Replace the key slip after leveling the keys.
Questions from our customers:
Dear
Steve We have accidentally spilt a jug of flower's water onto the keys of our
cherished 2 yr old Yamaha Piano. We have removed the protective timbers and now
have laid the keys out to dry. Unfortunately, some of the wood has warped, including
a number of keys, making the key surface uneven. What can we do about the keys?
Is there anything further we should do to prevent more warping and damage over
the next 24 hours? Will the piano require more serious repair? (I know how difficult
it is when the instrument isn't directly in front of you but whatever advice you
can give will really be appreciated)
May God bless you
Tim
Two possible techniques may give at limited results:
1. If a key lever is not seriously out of line at the rear, or even the front, some filing might stop the rubbing of parts against each other. Also, you may tap the top of the center pin where the key lever rocks to the right or left with some improvement. If the key lever is bowed up or down, shims could be added or removed from under the center pin.
2. This is drastic and should only be done if other methods fail. Determine which way the lever needs to be twisted of forced in order to come back into line. Secure the key lever in a bench vice by one end, twist the lever with vice grips or an attached "C" clamp to align it in the direction needed to straighten it. Try to go somewhat beyond where you want it to come to. Have a friend, holding a lit propane torch, heat the wood, not quite scorching it. Remove the heat, and hold tension on the key lever while it cools. Let go and see if this helped. If so, try other key levers.
Caveat emptor-- You are 100% on your own with this. The key lever could break as you do this, and that pretty much destroys it.
![]()


 On to task 36
BACK TO PIANO TITLE PAGE