| STORE
HOURS 9 TO 6 CDT GMT minus 5 hours Monday thru Friday Do not call on Sat. Sun. please |

 50.
Piano Pin Block
50.
Piano Pin Block
Separating from Frame
We sell new pin blocks of exceptional quality,
from both US and German
suppliers.
Replacing a pin block is a very difficult task. It is one of the most precise and skilled jobs in piano repair, and a blunder can be very costly. You know that you probably need a new pin block when several tuning pins are so loose that they won't hold, even after all desperate repairs to the tuning pins have been tried. I will say that a handful of our online customers have replaced pin blocks themselves, but you should send me e-mail to learn what is involved so that you can determine if the task is beyond your skill lever.
Grand pianos can have separation, but it is not as serious, as a rule, since the pins are not pulling in a way to drag the pin block on out of the piano. It would be possible to bolt a grand pin block solid in the same way as the upright below, but it would really look crazy, and some very special tools would be needed to drill from under the pin block and recess the nuts. Just forget it please :-)
A
separating pin block is identified in this way--
Upright Piano Only
 With
the (upright) piano top open, look at the top of the metal and wood frame. (If
your piano has a felt piece covering the top of the pin block and frame, remove
it.) From front to back, you see the metal frame, then the top of the pin block,
and then the upper part of the massive wood frame that goes all the way to the
bottom of the piano behind.
With
the (upright) piano top open, look at the top of the metal and wood frame. (If
your piano has a felt piece covering the top of the pin block and frame, remove
it.) From front to back, you see the metal frame, then the top of the pin block,
and then the upper part of the massive wood frame that goes all the way to the
bottom of the piano behind.
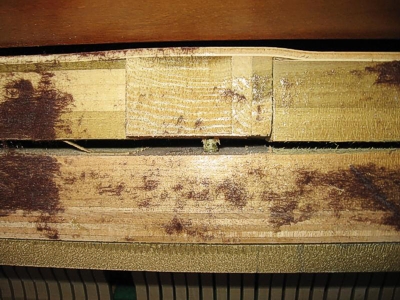
When a pin block begins to separate, you will see a crack between the pin block wood and the wood of the frame. This usually is worst in the center of the piano. A thin crack should be measured and checked every six months. An automotive "feeler gauge" could be used for an accurate check each time.
If the crack is slowing opening, you better get to work on it. If it has opened quite a bit-- one sixteenth to a quarter inch, a mild panic would be in order. A half inch or more-- Call the tuner. It's probably gone. Be ready for bad news. The problem is, when the pin block bows too far, it will also crack vertically through the tuning pin area, the worst being in the center where the pins are close to the top of the pin block.
 So,
the crack is not too wide, and it may be in two places along the top. It is very
likely that you can make the repair that will last until you pass the piano on
in your will to the kid. Then he can worry about it. So, here it goes...
So,
the crack is not too wide, and it may be in two places along the top. It is very
likely that you can make the repair that will last until you pass the piano on
in your will to the kid. Then he can worry about it. So, here it goes...
ILLUSTRATIONS:
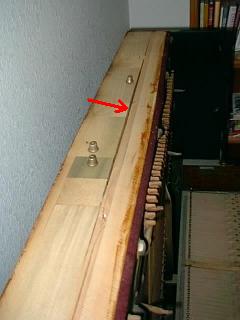
The upper left graphic is a very old Straube/Hammond Upright Grand. It is hard to tell if there is a harp coming to the top of the piano or if it stops below the pin block. When the pin block is open with no harp securing it, the situation is very critical, for the block could break out at any time. I suggested my customer, Charles Lewis, add two bolts to this piano. They should be to the right and left of the middle bolt in front of the red arrow, and placed half way to the bolts to the right and left. This should be done first, then the old bolts replaced. The new bolts should not be brought up tighter until ALL bolts are replaced. As elsewhere in this section, don't draw the bolts all the way up if you sense the pin block wants to crack. Securing the pin block is the priority, and the crack can be left part way open.
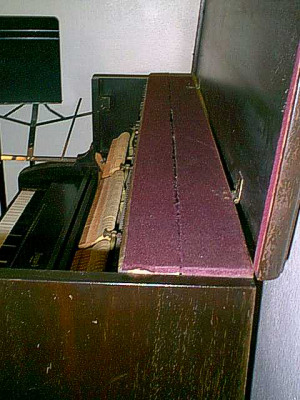
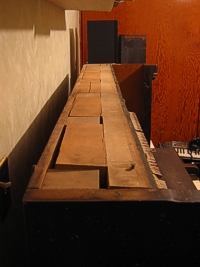
The graphics with the maroon felt top cover are of a Baldwin. The felt is sometimes a factory feature, but it is sometimes added by crooked piano stores to hide the separation of the pin block from the wood frame. Before buying a used piano with a felt cover of the pin block, run your finger along the point where the pin block and frame meet. If a groove is pronounced and easy to indent along the line with your fingernail, refuse to buy the piano unless they remove the felt part way along the top for examination. If they refuse, run for the door fast. Never buy such a piano, no matter what they promise. Refuse it if they offer to repair it.
Get these tools
A sturdy "C" clamp that will open wide enough to go over the top of the piano. A monster screw driver. Buy, at the hardware store, four three eighths inch hex head "stove" bolts at least an inch longer than the top of the piano is deep. Get one hex nut and two one inch washers for each bolt. You will need a regular three eighths inch drill bit, longer than the piano top is deep, and a drill motor. Two wrenches the size of the bolt heads and nuts. Also, find or buy a one inch minimum flat wood bit.
Check out the Diagrams before you go on to do the repair.
Please follow my instructions precisely
FIRST, (having removed the lid) clamp the top of the piano with the "C" clamp snugly but not tight. Do this near one of the big screws at the top where the crack is. All you want is control.
SECOND, With the big screw driver, remove the wood screw at that point. If it has a hex head lag bolt, use your end wrench.
THIRD, Chuck the regular three eighths inch drill bit, and drill out the hole where the screw was, working from the inside of the piano. Drill the hole out the back of the piano. You are drilling through very old hard wood, so go slowly, and pull the drill bit out from time to time to clean out the shavings. The drill bit will heat up enough to snap it if you just lean on it and don't let off. Be very sure you are drilling on the level. Ask a friend to stand to the side to tell if you are on the level. If you are a politician this is hopeless, of course :-)
FOURTH, Go around back, and use the one inch flat bit to recess the hole at least three fourths of an inch. The bit will flop around a bit, but this is the order I have found I have to use. The only alternative is to run a lead hole through from the inside with a 1/8 inch long drill. Use the first hole from the back of the piano for control, and recess the hole in back with the flat wood bit, then run the 3/8 inch drill through, using the 1/8 inch hole as a guide. This long method gives better control of the flat wood bit and a bit cleaner recess.
FIFTH, Put a washer under the head of the bolt, and push it through the hole BACK TO FRONT, OUTSIDE TO INSIDE. Tap the bolt and washer down snug into the recessed hole. Put the nut on the bolt inside with the washer, and tighten it snug, NOT tight. You DO NOT, DO NOT, DO NOT, DO NOT, DO NOT, DO NOT want to close the crack up!!!!!!!. If you try to close the crack, you will crack the pin block worse than before. It is warped and dry from many years of being in that position, and all you want to do is stop the movement. Close the crack, and you deserve all the pain you get. How else can I say it?
For a precise treatment, check the crack with an automotive feeler gauge as you tighten the nut. Add blades of the feeler gauge until they are snug in the crack. When the crack starts to tighten on the feeler gauge as you check it, STOP there. You are tight enough.
If the washer under the nut will not sit flat-- if it wants to hang up on the casting of the metal harp next to the hole, go find a grinding wheel, and grind it so that it fits flat under the nut. Do not try to bend it into place by tightening the nut.
SIXTH, Remove the "C" clamp, move to the next screw in the cracked area, and repeat the process. Seldom will you have to do the two extreme right and left hand screws. However, if the top wood structure is cracked at the ends, the two end ones must also be done.
SEVENTH, If your bolt ends stick out pretty far into the piano, you would be kind to the tuner to cut the ends off with a hack saw or Dremel tool.
EIGHTH, If you used hex head bolts, DO NOT fill the holes in the back with anything. You may put a removable plug in them. You might need to tighten the replaced bolts some day, and you would need to get your socket on the bolt heads. I prefer stove bolts. The square shoulder will embed into the washer, and the thing will not go anywhere. But, after a year, snug the nuts up a bit since the stove bolt could give a bit and sink deeper.
Now, that wasn't so bad was it? I suggest that you do all of the screws with new ones if it looks at all questionable. Why leave a couple? Make the whole thing secure so you can forget about it for the next 150 years.
 Freak
Situation
Freak
Situation
Here is a case where the pin block and harp stayed reasonably straight, but the frame separated. In this case, do the bolt repair above, but do all the bolts without tightening them. Once the bolts are in place, tighten them in many steps, going back and forth among the bolts. This way the pin block and harp may not break if you move them back and keep them from bowing.
Dear piano manufacturers
Why don't you arrogant people put bolts all the way through the top at the factory? A good piano should last for 80 years. By putting in those wood lag screws, you are admitting that you don't really care about the last 40 years of its life. Wake up please! AND, I salute the hand full of piano makers who DO bolt the top solid.
![]()


 On to task 51
BACK TO PIANO TITLE PAGE
![]()